
Posts on Happily Homegrown contain affiliate links. When you make a purchase through an affiliate link, your price will be the same, but Happily Homegrown will receive a small commission. Thank you for your support!
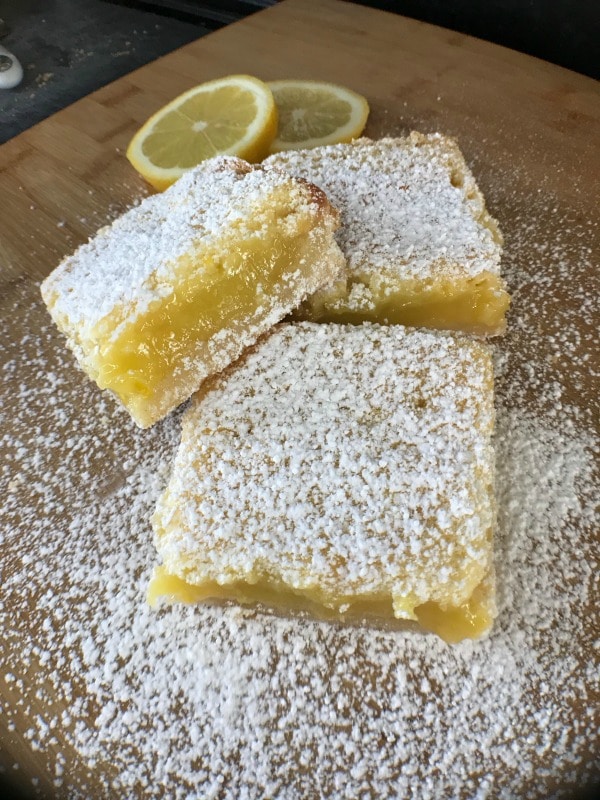
These easy lemon bars are the perfect balance of sweet and tart. Delicious buttery shortbread crust with a refreshing lemon layer and a dusting of powdered sugar makes these the best lemon dessert you’ll ever make.

When people think of lemon desserts they usually go to lemon meringue pie, but what if I told you there is a delicious and simple tray bake that will give you all that lemony goodness? These easy lemon bars come together quickly, don’t require you to make lemon curd, and there’s
We love making these for picnics and summer BBQs, but also for holiday meals like Easter brunch. They can be casual or fancy, but they are always a hit.
What ingredients do you need to make lemon bars?
You need 8 ingredients to make lemon bars. Most of the ingredients are probably already in your pantry, and if not you can get them at any grocery store.
- butter
- powdered sugar
- all-purpose flour
- eggs
- granulated sugar
- salt
- lemon zest (Use a
microplane grater to take off just the outer zest of your lemon) - lemon juice

How do you make lemon bars?
There are two parts to a lemon bar – a crust layer and a lemon layer.
The first thing you need to do is make the crust layer, and for the best bars that means a shortbread crust.
Combine the butter, powdered sugar, and all-purpose flour to form a soft, crumbly dough. Then pat your shortbread crust into a 9×13 pan lined with baking parchment (it makes it easier to remove the bars after they are baked).
Bake the shortbread crust for 20 minutes at 350. This is only blind baking so the crust is not going to look fully cooked. That’s ok. Take it out after 20 minutes and allow it to cool.
While your crust is cooling, mix together the eggs, sugar, salt, lemon juice, and lemon zest. You want everything to be well blended. I like doing this in my mixer.
Pour the lemon layer over the cooled shortbread crust and then pop the whole thing back in the oven for another 20 minutes.
You know your lemon bars are finished when the lemon is set but has a slight wobble in the pan. Cool them on a rack before cutting them into bars.
Before serving, dust your bars with a little extra powdered sugar.
Do lemon bars have to be refrigerated?
Lemon bars need to be stored in the refrigerator because they contain eggs. Cool them completely on the counter before putting them in the fridge.
How long do lemon bars last in the fridge?
In my house, these only last a day or two in the refrigerator before they are gobbled up, but you can safely store them in there for up to a week.
What is the best way to store lemon bars?
After your lemon bars are chilled and sliced, store them in an airtight container with either parchment or wax paper between the layers so they don’t stick together.
Alternatively, once cooled and sliced, place the bars on a platter and cover them with cling wrap until serving. If you need to store them for more than a day an airtight container is best.
Can you freeze lemon bars?
Lemon bars do not freeze well. If this recipe makes too many servings for you, you can divide the recipe by half, and bake them in an 8×8 pan instead.


Easy Lemon Bars
These easy lemon bars are the perfect balance of sweet and tart. Delicious buttery shortbread crust with a refreshing lemon layer and a dusting of powdered sugar make these the best lemon bars you’ll ever make.
Ingredients
Shortbread Crust:
- 1 cup melted butter
- 1/2 cup powdered sugar
- 2 cups all-purpose flour
Lemon Layer:
- 4 eggs
- 2 cups sugar
- 4 Tbsp of lemon juice with pulp
- 1 tsp lemon zest
- pinch of salt
Instructions
-
Combine the butter, powdered sugar, and all-purpose flour to form a soft, crumbly dough. Then pat your shortbread crust into a 9×13 pan lined with baking parchment (it makes it easier to remove the bars after they are baked).
-
Bake the shortbread crust for 20 minutes at 350. This is only blind baking so the crust is not going to look fully cooked. That’s ok. Take it out after 20 minutes and allow it to cool.
-
While your crust is cooling, mix together the eggs, sugar, salt, lemon juice, and lemon zest. You want everything to be well blended. I like doing this in my mixer.
-
Pour the lemon layer over the cooled shortbread crust and then pop the whole thing back in the oven for another 20 minutes.
-
You know your lemon bars are finished when the lemon is set but has a slight wobble in the pan. Cool your lemon bars on a rack before cutting into bars.
-
Before serving, dust your lemon bars with a little extra powdered sugar.
-
Store your cooled lemon bars in an airtight container in the refrigerator for up to a week.
Did you make this recipe? Tag us @homegrownhuston on Instagram and use #HappilyHomegrown so we can feature you!
 Preparing for a No-Spend Month
Yum, I love lemon bars, I just pinned it for later. Happy Weekend, Kippi
Well, yes- I am going to make these this weekend for an Easter tea party tomorrow! Thank you, and happy Easter x
Hope you enjoyed your holiday!